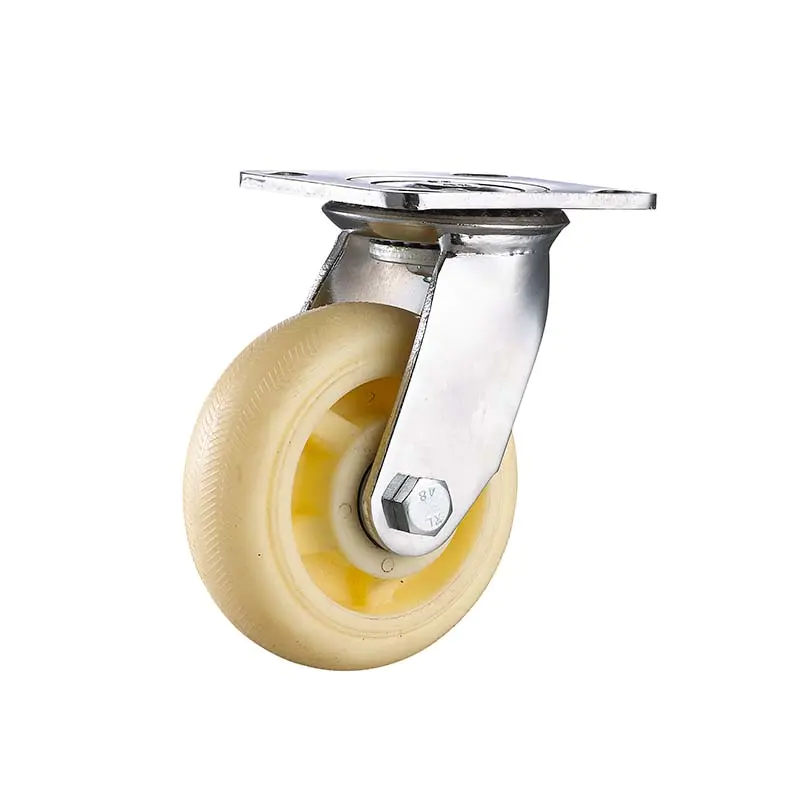
Medium heavy duty PU caster wheel for Roll container warehouse Logistic cargo cart
Medium-heavy duty caster
diy welding table
by:Dajin caster
2020-06-12
Metal table for welding.
It is designed to have space between the desktops, making it easy to use the flat bar as a grip for the foothold.
Size of 125 cm (l)x 75cm (w)x 90cm (h)
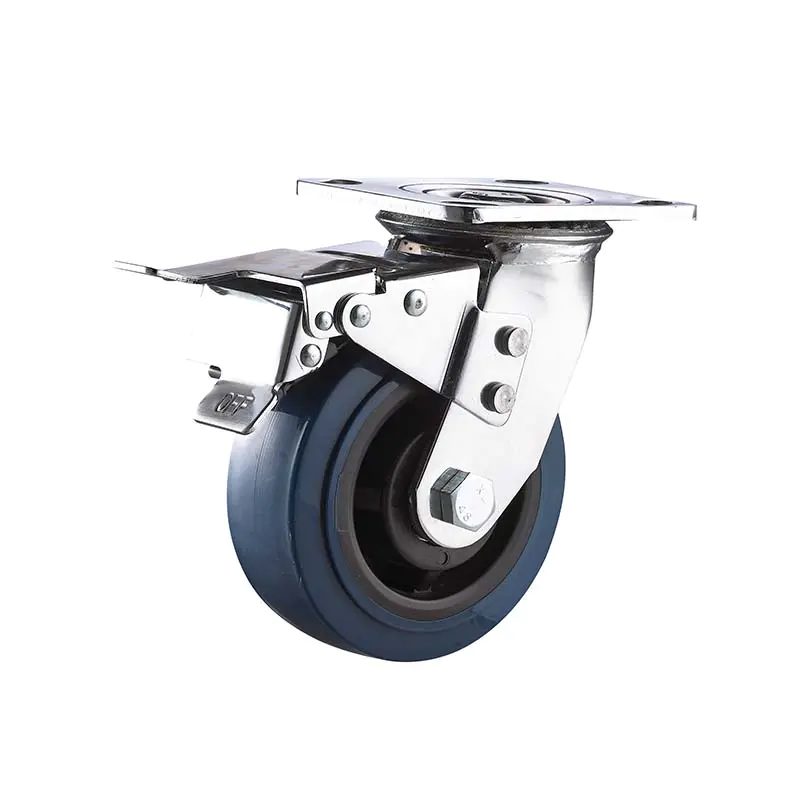
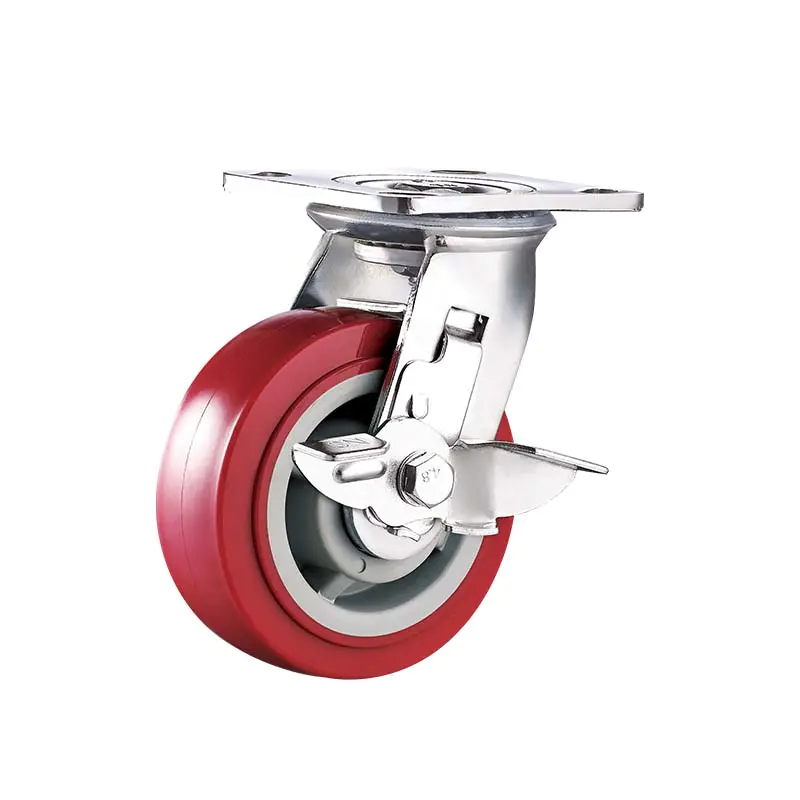
This table has four casters with brakes, suitable for holding objects of different sizes.
It is also strong enough to withstand heavy objects while keeping it movable.
Manufactured and used by BijiBiji initiative. www. biji-biji. com 1. 5x1.
5 inch square hollow soft steel 75 cm x 4 pieces 1. 5x1.
5 inch square hollow soft steel 110 cm x 1 piece 2. 5x1.
5 inch square hollow soft steel 125 cm x 4 pieces 2. 5x1.
5 inch square hollow soft steel 75 cm x 4 pieces 2. 5x1.
5 inch square hollow soft steel 63 cm x 1 piece 4-inch 5mm flat strip 75 cm x 8 pieces 2-inch casters wheels with broken. The total number of square hollow metal rods you should have is 14.
I chose to use a thicker width to give the table a stronger feel.
However, the thinner bar can also be used to give it a lighter touch depending on how bulky the table you want.
As for the flat bar, I chose the thickness of 5mm to provide enough strength and support for the object placed above.
The size of the casters also depends on the manufacturer, as long as it can support the weight of the table.
Heavy duty casters are recommended for this purpose. 1. Drop saw2.
Angle grinder and grinding plate 3.
Welding machine 4. Spirit levels5. Set square6.
1. Paint and paint. Cut the 2. 5x1.
Use the drop saw to cut the 5 inch square hollow metal rod into 45 degrees on both sides.
The 125 cm and 75 cm bars do the same.
You will cut a total of 8 bars on both sides. 2.
Straight Cut for 2. 5x1.
5 inch long 63 cm square hollow metal rod. 3.
Cut straight cut for all 1. 5x1.
5 inch square hollow metal rod. 4.
Cut straight cut for all 4 inch 5mm flat metal bars. 1.
Align 45 degree cut 2. 5x1.
The 5 inch square hollow metal rod is divided into 2 groups of rectangles with a length of 125 cm and a width of 75 cm.
Use the Set Square to ensure a 90 degree angle.
Weld and fill the gap. 2.
On a set of rectangles, add 63 cm 2. 5x1.
A 5 inch square hollow metal rod is placed vertically in the middle to increase the support of the structure.
Before welding, use the mental level to ensure the surface is flat.
This rectangle will be the bottom of the table. 3. Set a 75cm 1. 5x1.
Starting from the previous step, each corner of the rectangle has a square hollow metal bar of 5 inch square.
As shown in the figure, the mental grade is used to ensure the bar is flat before welding. 4.
From the previous step, add a second rectangle at the top of the structure and weld them all together. 5.
Flip the bottom up structure and place the casters in every corner of the bottom.
Weld them in place.
It should look like the picture shown. 6.
Add 110 cm 2 again. 5x1.
As shown in the figure, a 5 inch square hollow metal rod is placed horizontally in the middle of the top rectangular piece and welded in place.
Make sure it is flat with the top frame as this is where the flat metal bars are placed and rested. 1.
As shown in the figure, place all flat metal rods of 4 inch 5mm in place.
Separate them evenly and make sure that the clip can easily pass through the gap.
In my case, the spacing between each bar is about 6 cm. 2.
When you are satisfied with the placement, start first with the center part of the nail Welding flat bar.
After that, continue to systematically weld the sides of the flat bar to the frame.
This is to prevent uneven warping of the metal. 3.
After that, the flat metal rod is completely welded to the frame structure in the same order to prevent warping. 4.
Finally, grind all the sharp edges using an angle mill with a grinding disc to make it smooth.
Your table should now look like the picture above.
To finish your table, you can choose to paint it in the color that suits your workshop.
Further modifications can be made where needed, such as adding easy-to-manipulate handles, or adding a piece of plywood to cover the bottom of the table, which can also be used as a place to store items.
Congrats!
Your welding table is now complete and ready to take on your daily welding work.
Thank you for checking this note.
For cooler builds and installs, please visit our website www. biji-biji.
Com or send us an email at share @ bijibiji.
If you have any questions.
We are an open source social enterprise based in Malaysia that advocates environmental sustainability.
We incorporate the update of the waste material into our design and hope to inspire others to adopt the movement. The Biji-
Biji initiative-We make things.
Build a building at a time to save our environment.
It is designed to have space between the desktops, making it easy to use the flat bar as a grip for the foothold.
Size of 125 cm (l)x 75cm (w)x 90cm (h)
This table has four casters with brakes, suitable for holding objects of different sizes.
It is also strong enough to withstand heavy objects while keeping it movable.
Manufactured and used by BijiBiji initiative. www. biji-biji. com 1. 5x1.
5 inch square hollow soft steel 75 cm x 4 pieces 1. 5x1.
5 inch square hollow soft steel 110 cm x 1 piece 2. 5x1.
5 inch square hollow soft steel 125 cm x 4 pieces 2. 5x1.
5 inch square hollow soft steel 75 cm x 4 pieces 2. 5x1.
5 inch square hollow soft steel 63 cm x 1 piece 4-inch 5mm flat strip 75 cm x 8 pieces 2-inch casters wheels with broken. The total number of square hollow metal rods you should have is 14.
I chose to use a thicker width to give the table a stronger feel.
However, the thinner bar can also be used to give it a lighter touch depending on how bulky the table you want.
As for the flat bar, I chose the thickness of 5mm to provide enough strength and support for the object placed above.
The size of the casters also depends on the manufacturer, as long as it can support the weight of the table.
Heavy duty casters are recommended for this purpose. 1. Drop saw2.
Angle grinder and grinding plate 3.
Welding machine 4. Spirit levels5. Set square6.
1. Paint and paint. Cut the 2. 5x1.
Use the drop saw to cut the 5 inch square hollow metal rod into 45 degrees on both sides.
The 125 cm and 75 cm bars do the same.
You will cut a total of 8 bars on both sides. 2.
Straight Cut for 2. 5x1.
5 inch long 63 cm square hollow metal rod. 3.
Cut straight cut for all 1. 5x1.
5 inch square hollow metal rod. 4.
Cut straight cut for all 4 inch 5mm flat metal bars. 1.
Align 45 degree cut 2. 5x1.
The 5 inch square hollow metal rod is divided into 2 groups of rectangles with a length of 125 cm and a width of 75 cm.
Use the Set Square to ensure a 90 degree angle.
Weld and fill the gap. 2.
On a set of rectangles, add 63 cm 2. 5x1.
A 5 inch square hollow metal rod is placed vertically in the middle to increase the support of the structure.
Before welding, use the mental level to ensure the surface is flat.
This rectangle will be the bottom of the table. 3. Set a 75cm 1. 5x1.
Starting from the previous step, each corner of the rectangle has a square hollow metal bar of 5 inch square.
As shown in the figure, the mental grade is used to ensure the bar is flat before welding. 4.
From the previous step, add a second rectangle at the top of the structure and weld them all together. 5.
Flip the bottom up structure and place the casters in every corner of the bottom.
Weld them in place.
It should look like the picture shown. 6.
Add 110 cm 2 again. 5x1.
As shown in the figure, a 5 inch square hollow metal rod is placed horizontally in the middle of the top rectangular piece and welded in place.
Make sure it is flat with the top frame as this is where the flat metal bars are placed and rested. 1.
As shown in the figure, place all flat metal rods of 4 inch 5mm in place.
Separate them evenly and make sure that the clip can easily pass through the gap.
In my case, the spacing between each bar is about 6 cm. 2.
When you are satisfied with the placement, start first with the center part of the nail Welding flat bar.
After that, continue to systematically weld the sides of the flat bar to the frame.
This is to prevent uneven warping of the metal. 3.
After that, the flat metal rod is completely welded to the frame structure in the same order to prevent warping. 4.
Finally, grind all the sharp edges using an angle mill with a grinding disc to make it smooth.
Your table should now look like the picture above.
To finish your table, you can choose to paint it in the color that suits your workshop.
Further modifications can be made where needed, such as adding easy-to-manipulate handles, or adding a piece of plywood to cover the bottom of the table, which can also be used as a place to store items.
Congrats!
Your welding table is now complete and ready to take on your daily welding work.
Thank you for checking this note.
For cooler builds and installs, please visit our website www. biji-biji.
Com or send us an email at share @ bijibiji.
If you have any questions.
We are an open source social enterprise based in Malaysia that advocates environmental sustainability.
We incorporate the update of the waste material into our design and hope to inspire others to adopt the movement. The Biji-
Biji initiative-We make things.
Build a building at a time to save our environment.
Custom message
Related Products